
5 important Facebook privacy settings you NEED to get right
To most people, Facebook can seem like it has a myriad of important settings related to both your privacy and security, spread out in different, hard-to-locate reaches of the social networking platform.
Despite efforts by Facebook to make their settings more intuitive and easy to control, many users still feel lost. But fear not, that’s where we come in. While there are quite a few settings we always recommend putting into place (see our full guide here) not all privacy settings are born equal. Here are the most important five that we feel are VERY important to get right.
Providing you get all these settings right, you can’t go far wrong.
5. Who can see my stuff?
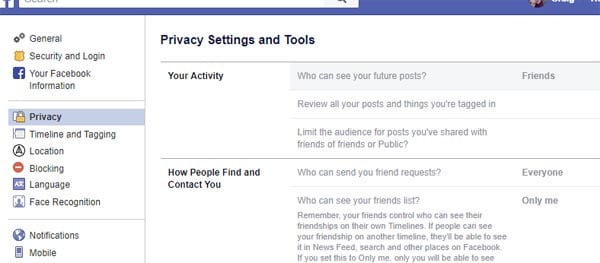
If there was a grand-daddy to all your privacy settings, the big one, the all-important control, it’s this one. It’s the setting that controls who can see what you put on your timeline, including your posts, photos, videos and anything else.
We cannot stress this enough. It needs to be FRIENDS ONLY! If set to public, then anyone can scroll to your timeline and see all your posts. That makes you a potential target for identity theft. It also makes you vulnerable to a number of other potential lurking threats.
It doesn’t matter if you think the stuff you post on Facebook isn’t of interest to strangers and criminals – you could be wrong. Even seemingly innocuous information about you can be collected and used to commit identity theft.
Additionally, having your privacy settings wide open also puts your friends privacy at risk too. For example, if you post a photo of you and friends to Facebook and they get tagged in that photo, anyone can see it. You may not care who can see your personal photos, but your friends may not be so privacy-flippant.
Checking this setting is easy. If you’re using Facebook for desktop, just click the arrow on the top right and select Settings and then Privacy and change the Who can see your future posts? option to Friends (see below.)
On the mobile app, select the three line icon, select Settings & Privacy, then Settings and then Privacy Settings and change the same option.
If you’re changing this option, also select the Limit Past Posts option to apply that setting to all the information you’ve already posted on Facebook.
4. Review your tags
One of the most frustrating things on Facebook is that you cannot stop people tagging you in posts. You can, however, review tags before they appear on your timeline, and remove them if necessary. This doesn’t stop you getting tagged, but it can reduce their visibility.
On Facebook for desktop, again click the down arrow, select Settings, then Timeline & Tagging and enable the Review tags people add to your posts before the tags appear on Facebook? and the Review posts you’re tagged in before the post appears on your timeline?
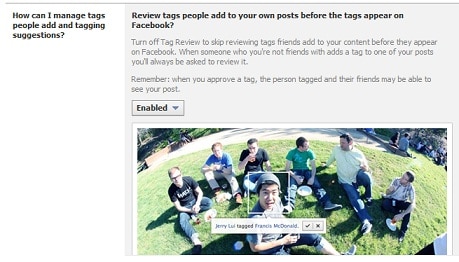
On the Facebook app, select the three line icon, select Settings & Privacy, then Settings and then Timeline & Tagging option and enable the same options.
When enabled, anything you’re tagged in does not appear on your timeline until you allow it.
However, it is important to remember that this doesn’t stop the tag from being made. You are still tagged in the post, and as such it may still be available to your friends who already were able to see the post based on its privacy settings. We discuss the benefit of enabling this option in more detail here.
Sponsored Content. Continued below...
3. Hide your friends list
With the rise of Facebook cloning scams, we recommend hiding your friend list so strangers cannot see who you are friends with on Facebook.
Cloning scams are where a criminal will create a new account using your name, profile picture and cover photo. As such, it appears to be a clone of your account. It’s not you but your friends that the criminal is after. If the criminal can see your friends list, they’ll send them friend requests from the cloned account, and if your friends accept (thinking it’s you) they can be potentially tricked into falling for any number of scams.
Of course, if the criminal cannot see your friends list, they won’t be cloning your Facebook account since they won’t know where to send out those requests!
To change this setting, on Facebook for desktop, click the down arrow, select Settings and select Privacy and change the Who can see your friends list? option to Only Me
On the mobile app, select the three line icon, select Settings & Privacy, then Settings and then Privacy Settings and change the same option.
2. Login Alerts
Login alerts provide you with a notification if someone successfully logs in to your Facebook account from an unrecognised device. This gives you a warning if someone has managed to gain unauthorised access to your account. It’s an important option to enable.
To enable it, on Facebook for desktop, click the down arrow, select Settings, then Security and Login and scroll down to Get alerts about unrecognised logins and enable it.
On the Facebook app, select the three line icon, select Settings & Privacy, then Settings, then Security and login and enable the same option.
Sponsored Content. Continued below...
1. Review active Facebook Apps
The danger of Facebook apps has been well documented thanks to recent security breaches, yet the app platform is still open and anyone can develop and publish apps. Recent security breaches have led to a number of tightened security measures of Facebook’s behalf, such as “expiring” apps when you haven’t used them in a certain amount of time, and only allowing approved publishers to access in-depth information on your account.
But it’s still important you regularly review what Facebook apps are active on your account and remove any that you don’t recognise, since these can still access information about you.
To review your active apps on Facebook for desktop, click the down arrow, select Settings and then Apps and Websites and check the list of apps listed as Active.
On the Facebook app, select the three line icon, select Settings & Privacy, then Settings and then Apps and Websites. Then select Logged in using Facebook and check the apps listed under Active.
Consider 2 Step Authorisation
We haven’t listed this an option because we know that some people plain hate the idea of giving their phone number to Facebook, which is the most popular way of enabling Two Factor Authorisation.
However we list it here because we recommend enabling it, and you don’t need to part with your phone number to enable it. Two Factor Authorisation (2FA) provides an extra layer of security to your account, meaning if someone logs in to your account from an unrecognised device, they will need more than just the password to gain access.
Usually this means inputting a code that is sent to you via SMS, which means giving your phone number to Facebook. If you don’t want to do that, you can also purchase a 2FA USB key that works if you’re logging in from a computer, or perhaps most likely enable the Code Generator, meaning you need to generate a code on a device already logged in to your account which then gives you a code to enter on the device you’re logging in from.
Passwords are no longer sufficient to reliably protect a Facebook account, and we strongly recommend considering 2FA on your Facebook account (and indeed any important online account.)
You can check through your 2FA options by going to your Settings and clicking Security and Login.
Remember, you can read our ultimate guide to locking down your Facebook account here.
Also worth reading –
5 simple things you need to know about your Facebook privacy.
5 Facebook friends who put your privacy at risk.
Keep up-to-date with all our latest articles. Follow us on Facebook, Instagram and Twitter.
Continued below...
Thanks for reading! But before you go… as part of our latest series of articles on how to earn a little extra cash using the Internet (without getting scammed) we have been looking into how you can earn gift vouchers (like Amazon vouchers) using reward-per-action websites such as SwagBucks. If you are interested we even have our own sign-up code to get you started. Want to learn more? We discuss it here. (Or you can just sign-up here and use code Nonsense70SB when registering.)
Become a Facebook Supporter. For 0.99p (~$1.30) a month you can become a Facebook fan, meaning you get an optional Supporter Badge when you comment on our Facebook posts, as well as discounts on our merchandise. You can subscribe here (cancel anytime.)