
How to make your Facebook friends list private
Here’s a quick how-to on how to make sure that your Facebook friends list is set to private and why it’s so important.
On sites like Facebook you have your obvious must-do privacy configurations, like your post visibility settings, which of course should be set to friends only. Our full run-down on locking down that Facebook account can be read here.
And then there’s the not-so-obvious settings that may not strike you as something that really needs to be done, especially when the default setting imposed by Facebook is absolutely wrong. The privacy settings for your Facebook friends list is one of those settings.
Why do I need to make my Facebook friend list private?
It is important to limit the visibility of your friends on Facebook to protect them, since scammers can clone your account and use that account to trick your friends.
You see, if a scammer clones your account (by creating another account with your name and profile picture – two pieces of information you can’t hide from people) then they can start sending out friend requests to all of your friends in an attempt to trick them into accepting, thinking it’s you. However, if the scammer can’t see your friends list, the motivation to clone your account is gone.
If your friends list is public, and a scammer clones your account and sends out requests, and a friend request is accepted, the scammer can attempt to initialise any number of different scams on your friend, which could very well be successful. It’s called Facebook cloning and you can read more about it here.
How do I make my Facebook friends list private?
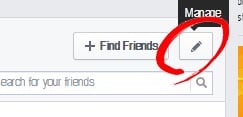
It’s pretty easy. If you use the Facebook desktop version, simply navigate to your timeline and select the Friends option underneath your cover photo. In there just select the pencil icon (see image below) on the right and select Edit Privacy. From there you can select the visibility of your friends list. We recommend Only Me or Friends Only. (Alternatively if you get no pencil icon you can go to your main Settings, select Privacy and the option is there.)
For the Facebook mobile app, click the three lined icon, then go down to Settings & Privacy, then Settings and then Privacy Settings and change the Who can see your friends list? option.
Sponsored Content. Continued below...
That’s it!
We generally recommend people do this. Facebook is a great way to keep in contact with friends and share information, but we should always try and keep the amount of information we share with the general public to a minimum, including how we are friends with on Facebook.
Continued below...
Thanks for reading, we hope this article helped, but before you leave us for greener pastures, please help us out.
We're hoping to be totally ad-free by 2025 - after all, no one likes online adverts, and all they do is get in the way and slow everything down. But of course we still have fees and costs to pay, so please, please consider becoming a Facebook supporter! It costs only 0.99p (~$1.30) a month (you can stop at any time) and ensures we can still keep posting Cybersecurity themed content to help keep our communities safe and scam-free. You can subscribe here
Remember, we're active on social media - so follow us on Facebook, Bluesky, Instagram and X